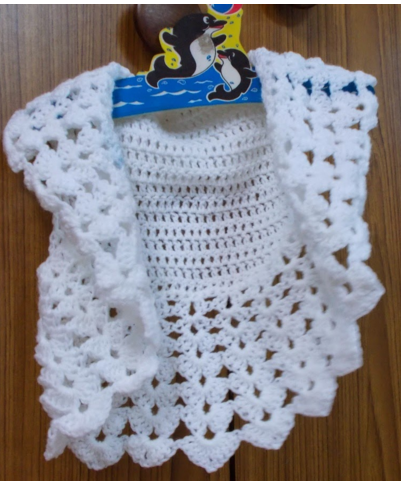
MY PINK CHEVRON DRESS
Just a few days back, I made a dress for a
friends grand twin grand daughter .. well, for one of the twins. I think that has turned out really neat, and
I then could not find anything of a similar nature for the second grand child –
and I have a long list of dresses that I have pinned at that!
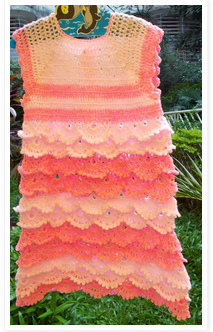
Then as usual Providence Stepped In and this
lovely photo was shared – guess The Universe knew I was looking for something
just right !
Thank you for joining me.
In case you have just joined me, know that you can access all of my earlier creations by checking under ‘categories’ on the right hand side of this blog under “Labels”. Then, for your convenience, follow me here or on Facebook, You Tube, Pinterest, Twitter or Instagram. Check out all my social media handles at the bottom of this blog
Oh, and may I add that the fastest way to find any of my blogs is via Pinterest.
Do remember to add my blog URL when you make and show off your creation.
Cheers. Enjoy
To purchase this or similar yarn online, click on the link at the top right of this blog that reads click here to buy your yarns online via Amazon. While you will still pay the same, I may get paid by Amazon as well. This is a free blog - so do pay it forward for me. Cheers.
Do check my long Pinterest “to-do” list for
little girl’s dresses at https://in.pinterest.com/shyamanivas/girls-dresses-to-make/
Thanks for joining me once again as we work on
and discover this new pattern together.
Inspired by this photo , here are
my pattern notes.
Materials used : Today I’ve
used ~ 220 gms of our
lovely Indian Oswal Cashmilon 4-ply acrylic yarn with a 3.5 mm crochet hook ;
Optional : Stitch
marker
Size made : For
a 5 yr old
Difficulty level
: Intermediate Skill level
Abbreviations :
sc : Single crochet yo : Yarn Over
st(s) : Stitch(es) hk : hook
lp(s) : Loop(s) dc : Double crochet
sl-st : Slip Stitch
sc-blo : Single Crochet Back Loop Only
fsc : Foundation single crochet
hdc : Half Double crochet
Stitches used :
Starting slip knot : Here’s how you start with a slip knot. https://youtu.be/lJcqsVcs8cw
Starting slip knot 1 or the Sloppy Slip knot : This is a neat new way to start your work without a slip knot. https://youtu.be/YfC7KmGpifs
What is a chain stitch ? Here is an easy video tutorial https://www.youtube.com/watch?v=pXx5ukBjKkY
What is a slip stitch : Here is a neat video tutorial at https://youtu.be/weB3QNbA8Iw
Single Crochet : Sc : yo, insert hk into st ; yo (2 lps on hk); yo, draw through both lps. One sc made. Check out the video at https://youtu.be/ghACqBpA-3k
First stitch for Single Crochet : This is how I like to start my row of sc.
Check out the video at https://youtu.be/6pVYRfsf4_M
Check out the video at https://youtu.be/6pVYRfsf4_M
Half Double Crochet : Hdc : yo, insert hk into st ; yo (3 lps on hk) ;
yo, draw through all 3 lps. One hdc made.
Check out the video at https://youtu.be/sDiELJdB2Dg
Chainless start for Half Double Crochet : I dislike the ch-2 start, and this is what I do to start my row of hdc. Check out the video at https://youtu.be/lWXpl1KdbZ8
Double Crochet : dc : yo, insert hk into st ; yo (3 lps on hk);
[yo, draw through 2 lps] twice. One dc made.
Check out the video at https://youtu.be/xdnjB27zpYo
Chainless start for Double Crochet : I dislike the ch-2 / ch – 3 start, and this is what I do to start my row of dc.
Check out the video at https://youtu.be/wskv3iTjRx0
How to change colors seamlessly : Here’s an easy video tutorial to show you how to change from the Main color to the Contrast or second color of yarn seamlessly. View it at https://youtu.be/fRzSBja9jno
How to carry your yarn when using two colors : Here’s an easy video tutorial to show you how to carry your yarn along when working with two colours.
View it at https://youtu.be/NuascBU3pxQ
Pattern instructions : (Using U.S terminology)
Please note that I start all my rows with a ch 1, turning chain for ease.
Please check the top of this blog (as well as through the blog) for easy video tutorials on all stitches used in today's pattern.
Please read through all my notes before you pick up your hook, so you know just where we're heading in our pattern.
So before we set off on our new creative
journey, let’s take a quick look at what we’re creating here today.
We start with the yoke, working from the waist
up. Once again I’ll say, it’s up to you
to decide *where* your *waist* is – by that I mean that you can have it just
under the armholes, or you could go way lower to the waist. Whatever you decide, remember that you will
work half that round measure (so either half round chest or half round
waist).
Also remember that you need to ensure that you
need to work with the largest of these measures (i.e if you want your
yoke starting at waist, but the chest measure is larger, then that’s you will
use half the chest measure)
We will then work on the skirt portion of our
dress off the bottom of the yoke.

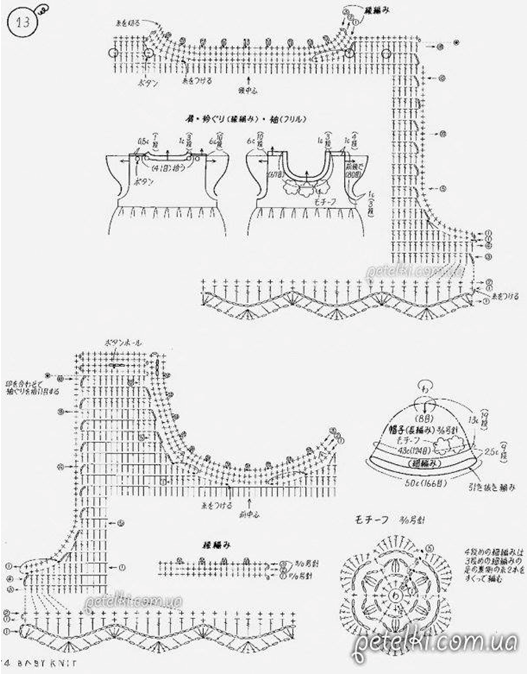
Part 1 : Yoke

We will work one front and one back
separately.
There is no stitch count for
our yoke.
Our stitch count for the skirt is in multiples of 16
So here are two ways you can work the yoke.
1. You
work in plain sc / hdc or dc all the way from the waist up to the chest
calculating half the round waist measurement
2. You
work in multiples of 8 (which is the skirt stitch count) for the number
of stitches you’ll need for half the round waist measurement
The advantage
in choosing this option is that when you start with the skirt portion, you do
not need to recalculate. When we reach
the skirt portion, there is another tip to increase the flare of your dress,
but that’s for later.
Now that you have figured out which measurement
you are using, let’s hook on.
Start Row 1 : with
as many fsc as needed for the half round waist measurement.
Here’s when you decide which stitch you are
going to use. I have chosen the e-sc or
Extended Single Crochet and here’s a quick photo tutorial for the e-sc.
Extended single crochet (e-sc) : Here is an easy video tutorial


For convenience though, I’m writing it as though
we’re using a dc.
Row 2 : dc in the 1st
fsc and in each fsc till end. Turn.
Row 3 : dc in the 1st
dc and in each dc till end. Turn.
Rep Row 3 till your project reaches the armhole
level.
Armhole shaping
For our armhole decrease we will work just one
decrease row.
Armhole shaping Row :
sl-st in the 1st 4 dc ;
dc in the next dc and in each dc till the
last 4 dc.
Sk last 4 dc. Turn.
For a little girl age up to 3 yrs, this one
decrease should be good enough.
For any further decrease, work as follows
Double crochet 2-tog : dc 2-tog : [yo, insert hk in st or ch-sp, yo and pull up a lp ; yo and draw through 2 lps] 2 times (3 lps on hk) ;
{yo, draw through 2 lps on hk} 2 times. One dc 2-tog made.
This video tutorial at https://youtu.be/1_oPlUfN5eg shows you how to use the dc 2-tog to decrease.
Sometimes we work the dc 2-tog in the same stitch, to use as a decorative stitch. Visit this video tutorial at https://youtu.be/lLUXOJ1sY9w
Armhole shaping Decrease Row :
dc 2-tog in the 1st 2 dc ;
dc in the next dc and in each dc till the
last 2 dc ;
dc 2-tog in the last 2 dc.
Turn.
Please ensure that when you are decreasing, you
check against the chart given for chest measures (or for the across front /
across back measure if given) or against a well-fitting garment of the child
for whom this is intended. For little
kids, a cut-away neckline may not look good.
Rep Row 3 till your project reaches the neckline
level.
For the neckline shaping, figure out how deep and wide you want your neckline, and then place a marker at the point that decides the sides of your neckline.
You will work from the armhole till marked st ;
dc in that marked stitch.
You will Rep Row 3, working back and forth from
neckline to armhole, till your project reaches the shoulder level, working one
shoulder at a time.
Fasten off and weave in ends.
Once done, return to the other marker (for the other side of the neckline) and work
a dc in that marked st.
Once again, Rep Row 3 till your project reaches
the shoulder level.
Fasten off and weave in ends.
You have completed one side of your yoke.
Repeat instructions for the other side (back) of
the yoke.
The only difference is that you will need to work in a small opening for the back button, and for this, I’d suggest that you keep a small opening just on the last few rows and at that time you will work back and forth for these few rows from the centre of your yoke to the armhole end and back till you reach the shoulder level.
Fasten off and weave in ends.
Join your two yokes at the shoulders and sides.
Whipstitch to join : Here’s a quick tutorial on how to join using the whipstitch at https://youtu.be/wZ-9LNzftMA
Invisible join : Here’s a quick tutorial on how to join using the embroidery needle and whipstitch to get an invisible join at https://youtu.be/a6XZQ6VzJFM
Single crochet to join : Here’s a quick tutorial on how to join using the single crochet at https://youtu.be/6FXoW_47_dI
Part 2 : Sleeves

You could leave this beautiful creation without
sleeves, but if you do decide on a little frill along that edge, then here’s
what I’ve done.
Sleeve Round 1 : sc
evenly all around your armhole , ensuring you have stitches in multiples of 4.
Round 2 : sc in the 1st
sc ;
*ch 5, sk next 3 sc, sc in the next sc* ;
rep *to*
all around and join with a sl-st to the 1st sc.
Now there are two options for your sleeve (as
usual.. options will mean choices, decisions, and chances for creativity for
you)
a) You
can opt to work a full circle (round) of stitches and keep joining at the end
of each round with a sl-st to the 1st st. In this case, you will get a full sleeve that
goes around the arm
b) You
can opt to do a partial Magyar-type sleeve that works itself in a slight curve
/ diagonal line off the bottom of the armhole (where it is the least wide) and
just grows in width along the shoulder line.
Option (a) is easy and you will just work in
rounds, so I will write the instructions below for Option (b). Choose your style and let’s create.
We will also use a decorative picot in the
following round.
I chose the ch-3 picot
for this which will be (ch 3, sl-st in the 3rd ch from hk).
Please read the top of this blog for a
“how-to” on picot stitches.
How to work a picot stitch : Traditionally for a ch-3 picot, you work (ch 3, sl-st in 3rd ch from hook). For a ch-5 picot, you will do (ch 5, sl-st in 5th ch from hook).
Here’s a great video https://youtu.be/8s3zVaBcn4s
We will work our picot stitch in the centre of
each ch-4 sp, so instructions will read sc + picot in that sp.
Row 2 : sl-st into
the 1st 5 ch-5 sps , sc + picot in that next ch-5 sp ;
*ch 5, sk next sc, sc + picot in the next
ch-5 sp* ;
rep *to*
all around till the 2nd last ch-5 sp ; sc + picot in
that ch-5 sp. Turn.
Row 3 : sl-st into
the 1st ch-5 sp , sc + picot in that same ch-5 sp ;
*ch 5, sk next sc, sc + picot in the next
ch-5 sp* ;
rep *to*
all around till the last ch-5 sp.
Turn.
Row 4 - 5 : Rep
Row 3.
Fasten off and weave in ends.
Note : You can
increase the number of rounds you are creating around each armhole depending on
how long you want your sleeve. Also in
case you are working your sleeve in rounds, you will have to work more rounds
till you get a decent sleeve length.
Please also ensure that you check the round arm measure of your child
and ensure that the round that you are working will fit her. Great!
Part 3 : Skirt for your beautiful dress

I suggest you work the skirt portion of our
dress in rounds. So one side was the
yoke, and we will now work from the other side.
Before we work out our stitch count, two points
:
1) Ensure that you manage to get the stitch
count by adding stitches if need be ; and
2) The more the number of stitches you have (in multiples,
of course), the more the flare / frills on your skirt for this dress.
Our stitch count for the skirt is 16
If you had checked this when working the yoke
section, then you’re ready to go,
or else, just to get the number of stitches
right, let’s work our first Start Round with a round of sc all around.
IF you have started with multiples of 16
for the yoke, then skip the Start round
Start : sc in 1st
st and in each st all round, ensuring you have multiples of 16.
Join with a sl-st to the 1st st.
Assuming that you have worked in multiples of 8,
we will start working on the other side of that 1st fsc foundation
round.
In our 1st round, we will use a
lovely combination of sts – so do check out what a hdc and trc are – on top of
this blog.
Round 1 : sc in 1st
fsc ;
ch 1, hdc in the next st ;
{ch 1, dc
in the next st} ;
rep {to} once ; ch 1, trc in the next st ;
*(rep {to} 2 times
; ch 1, hdc in the next st ; ch 1, sc in the next st) ;
[ch 1, hdc in the next st ;
rep {to} 2 times ; ch
1, trc in the next st]* ;
rep *to* all around ;
ch 1, and join with a
sl-st to the 1st sc.
You will end with a rep of (to).
Double crochet 5-tog as a decrease stitch : dc 5-tog : Here is an easy video tutorial for working a dc 5-tog over 5 sts at https://youtu.be/Dh2viux_fBA
Double crochet 5-tog as a decorative stitch : dc 5-tog : Here is an easy video tutorial for working a dc 5-tog all in the same stitch as a decorative stitch at https://youtu.be/5806EIpgcV8
In the following row, we will work a Special
dc 5-tog.
A dc 5-tog is usually
worked over 5 sts and here too we will work it over 5 sts which will include
ch-1 sps too.
So the 1st dc of the dc 5-tog will be over the hdc
; next over a ch-1 sp ; next over a sc ; next over a ch-1 sp and the last over
a hdc again.
We will start and end our rounds with this Special
dc 5-tog.
This will look a little different from the
chart, as the chart is being worked
Round 2 : sl-st into
the 1st hdc, ch-st and the 1st dc ; dc in the next dc ;
(ch 1, dc in the next st) ;
rep (to) once ; ch
1, 5 dc in the next st ;
*rep (to) 2 times ;
ch 1, Special dc 5-tog
over the next 5 sts ;
rep (to) 2 times ;
ch 1, 5 dc in the next st* ;
rep *to* all around,
ending with a Special dc 5-tog over the last 5 sts and
join with a sl-st to the 1st st.
Round 3 : sc in the 1st
dc ;
*sc in the next ch-1 sp ; sc in the next st* ;
rep *to* all around and join with a sl-st to the
1st st.
Round 4 : sl-st into
the 1st dc, ch-st ; dc in the next dc ;
(ch 1, dc in the next st) ;
rep (to) once ;
ch
1, 5 dc in the next st ;
*rep (to) 2 times ;
ch 1, Special dc 5-tog
over the next 5 sts ;
rep (to) 2 times ;
ch 1, 5 dc in the next st* ;
rep *to* all around,
ending with a Special dc 5-tog over the last 5 sts
and join with a sl-st to the 1st st.
And this is our pattern … simple.. a little
complicated, but ooh, soooooo pretty.
Rep Rounds 3 & 4 till your project is of the
length needed, ending with a Round 4.
Part 4 : Finishing options

So there are two finishing options
1. Finish
off with Round 3, sc in each sc and ch-sp all around
2. Finish
with a ch-3 picot ; which is (ch 3, sl-st into the 3rd ch from hk).
If you choose this option, I’d suggest you work your picot every 4th
st all around.
Fasten off and weave in ends.. and Voila ! Yet
another beautiful dress made for your young lady.
Ta da..
isn’t this just beautiful ??
I should
also share a new idea I had for the button.
Details
& photo at https://shyamanivas.blogspot.in/2016/06/chandras-frilled-dress.html
I had these lovely little pink
beads that I’d already used on that final row, and thought they’d look lovely
as a button. So first I took a regular shirt /pant button and covered it with a
little fabric. I then sewed in the beads
onto that little fabric top. The base of
the button was easy to attach on, as there is the fabric to hold on to.. and I
think the end result is pretty amazing.. what do you think?
Enjoyed this ?? I sure did.. come back right
here for more freebie patterns
If you're visiting me here for the first time,
and have liked the experience, do add me to your mailing list (for your
convenience) , and all my future free patterns will come straight to your mail
box.
I’d appreciate if you could credit my blog (and
link the original pattern link) when you make your own baby dress. Thanks.
Check out my awesome pins on Pinterest at https://in.pinterest.com/shyamanivas/ or just my free patterns at https://in.pinterest.com/shyamanivas/free-patterns-made-by-me/
Do also visit me at http://www.craftsy.com/user/2573073/pattern-store?_ct=cx-buvjdql&_ctp=my-pattern-store,manage
And please join me on my Facebook page at https://www.facebook.com/pages/Sweet-Nothings-Crochet/248919438644360 for
more patterns.
Have a great day and see you soon.
I have a few girls dresses already made, and just
in case you want a dekho at those free patterns … here you go